by Dennis Hevener
Reprinted from LOGic Lines 5.3, Nov 2000
Copyright 2000 by PDA
Modifying the QSL Card report
LOGic has unsurpassed printing capabilities. It comes with numerous reports, labels, QSL cards, and envelopes in various formats. These will suit most any need. However, it is easy to make nice personal touches to your reports, such as adding your own pictures, selecting colors and font styles, etc.
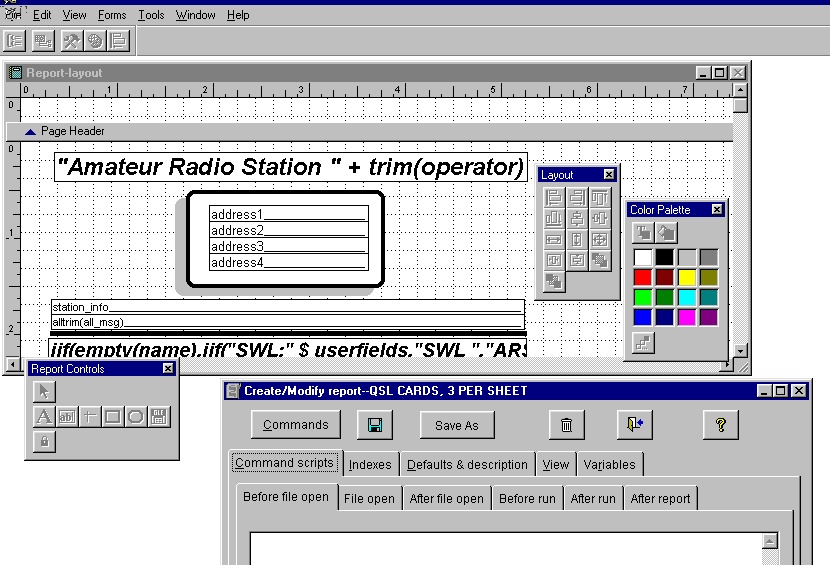
Let’s make some changes to one of the QSL card reports provided with LOGic. Let’s personalize a QSL card. I will use the QSL CARDS, 3 PER SHEET, COLOR report for this example, but you can look over the various QSL cards, choose the one that is most to your liking, and modify that. Close other windows in LOGic to simplify your screen. Go to File/Set Up Report. Select the report you want to modify. You may get a file selector asking you to choose a .BMP file. Choose ARRL LOGO SMALL from the IMAGES folder. You will be prompted to enter a message to appear on all cards, just as you are when running the report. Enter anything here.
The report writer setup screens will appear. There are two windows. One contains the graphical report layout, and the other contains non-graphical information such as which files to open, sort options, commands to run before and after printing the report, etc. We will have no need to change much on this screen. However, this screen has a few important buttons we will use. Let’s make our own copy of this report so as not to screw up the original (you could get it off the CD-ROM, but this is easier, and will prevent your changes from accidentally getting overwritten when you install an update). Click the Save As button, and enter My QSL Card or whatever name you want. This will create a copy of the factory report for your exclusive use.
Let’s play with the pictures first. You can delete the existing pictures by clicking on them once and pressing the {Del} key. Or substitute your own picture by right-clicking the image and selecting Properties. You may change the picture file name. Also of interest is the Clip Picture, Scale Picture Retain Shape, and Scale Picture Fill the Frame. Experiment with these options by selecting one, clicking OK, then resizing the picture with the mouse. To resize, click on the image to make sure it is selected, place the mouse on one of the handles on the sides or corners of the image, then hold down the mouse button and move the mouse. You will want to use Scale Picture Retain Shape in most cases. This allows you to resize the picture without distorting it. You may make a picture as big as you want, but it is best not to expand it beyond its original size, as the image quality will suffer.
You can move a picture or other object by selecting it, then dragging from somewhere inside the box surrounding the item. To precisely position something, click it once to select it, then use the arrow keys on the keyboard to move it.
To add a picture, first make sure the Report Controls Toolbar is visible. Click View on the menu bar. If there is no check mark next to Report Controls Toolbar, click it. To add the picture, click on the OLE button. Using the mouse, draw a box on the report layout approximately where you want the picture to appear. Hold the mouse button down and move the mouse. The Report Picture properties dialog will appear. Select a picture file and a scale mode. Click OK. You may now precisely position and size the picture as we have already discussed.
Now let’s play with the text that appears on the QSL card. At the top of the card layout it says "Amateur Radio Station …" This prints the header of each card, getting your callsign from the OPERATOR field from the log. Let’s change the font to something fancier or a different size. Click the box once to select it, then click on Format/Font on the menu bar. Select a new font or size. You can change the area of the card that the text occupies by dragging its container just as you did with pictures.
To change the color, open the Color Palette by clicking on the View/Color Palette Toolbar. Select the text field you wish to change by clicking it. Note the first two buttons select Foreground Color or Background Color. (Hold the mouse on top of the button to get a description). Make sure one, but not both, are pushed in. If the foreground and background colors are the same, the text will be invisible! Normally, you will want to change the foreground. Now click the color you prefer. The Other Colors button allows you to select any of the kazillions of possible colors.
To add your own text, use the Label or Field buttons on the Report Controls Toolbar and draw a box on the layout window, just as you did when adding a picture. A Label prints text that never changes. A Field prints information out of LOGic’s database. The Expressions and Functions section of Help explains the intricacies of what you see here.
Text Over a Picture
Let’s suppose that you want to have text displayed over a picture. Move the picture and text to the desired position on the screen. Make sure the picture is behind the text by clicking on the picture, then clicking Format/Send to back. Make the text transparent by clicking Format/Mode. Setting text to transparent causes the background color to be ignored, and allowing whatever is behind to show through the spaces between the letters and the holes in the letters. The transparency does not show up in the layout window, but you can see its effect in View/Preview.
Using these techniques, it is a simple matter to have a photo QSL card. Make the photo the same size as the actual card, then move it to the back. Make all the text transparent (see Multi-select below to learn how to change everything at once). You now have a picture-postcard with your QSL info printed on top!
The most difficult thing about making a photo QSL card is choosing a picture and text color that is visible. A low-contrast photo that is either very light with dark text, or a photo that is very dark with light text, works best. You can of course position text over areas of the photo where visibility is best.
Form size
Here is how LOGic handles different form sizes. It attempts to fit as many QSL cards on a page as will fit. This QSL card is 3.5" high. So it will print 3 cards on an 11" sheet of paper. If you changed your printer driver to accept a form that is 4" high, it would automatically print only one card per sheet. Note also that there is a ½" page header margin at the top of the report. To change the QSL card size, drag or double-click the DETAIL bar in the layout window. Change the Page Header the same way.
The W7NN QSL report prints cards side-by-side in columns on his special laser-perfed stock. Setup this report and look in file/page setup to see how multiple columns are handled.
Multi-select
You can change or move multiple items at once using multi-selection. Hold down the shift key and click on the items you wish to select. Or you may draw a lasso by holding down the mouse button while the pointer is on the background of the layout window, then moving the mouse. Anything inside the lasso or touched by the lasso will be selected.
Once multiple items are selected, you may proceed to change color, font, or position as usual. The Layout Toolbar is useful for aligning multiple objects.
Really Complicated
So far we have only made graphical changes to the QSL card. For those who like tinkering under the hood, let’s make some other changes. After this report finishes, it asks if you would like to mark the QSOs that cards were printed for as having been sent. This is done in the Command Scripts/After Run section. This is programming language that asks you if you would like to mark cards as sent. If you answer Yes, it will put Fulfilled in QSL Sent, and the current system date in the QSLSDATE user-defined field. If you are knowledgeable about programming, this will make sense to you. If you aren’t don’t worry about it. It isn’t important.
Note that this report uses the actual date of the system clock, not UTC, which may or may not be the same. A purist will want UTC here (but sorry folks, we can’t think of everything). This is easy to change. Look for this line:
replace qsl_sent with "F", userfields with tag_edit(userfields, "QSLSDATE, date()) for &selexp
Add this line above it:
global.update_utc
This causes LOGic to recalculate the current UTC time and date. Now change date() (a function that returns the system date) to global.utc_date (LOGic’s internal UTC date). The changed statement should look like this:
replace qsl_sent with "F", userfields with tag_edit(userfields, "QSLSDATE:", global.utc_date) for &selexp
Conclusion
As you can see, it is easy to make basic changes to the reports included with LOGic. With a little study, you can design your own reports.